
New article
Recently updated
Establishing Trust and Service Permission on SharePoint

Who is this article for?OnePlace Administrators.
Administration access is required.
This guide gives the steps for establishing trust and service permissions on SharePoint. Whether you're navigating these processes for the first time or seeking to refine your understanding, this introduction sets the stage for a comprehensive walkthrough, ensuring a smooth and effective configuration.
1. Establishing Trust and Service Permission on SharePoint
The Site Mailboxes feature requires that OAuth Trust is established and Service Permissions on SharePoint 2013 Server are set up.
1.1 Copy and Save Two Scripts
Download the archive, extract the files and place them on the SharePoint server with exactly the same names, do not rename the files.
1.2 Establishing Permissions
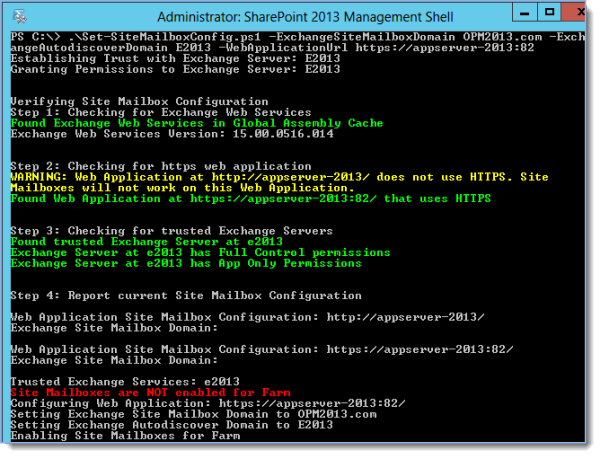
Run the SharePoint 2013 Management Shell, change to the directory where you saved the files and execute the following command:
.\Set-SiteMailboxConfig.ps1 -ExchangeSiteMailboxDomain <Domain> -ExchangeAutodiscoverDomain <Exchange Server> -WebApplicationUrl <URL>
Where
<Domain> is the FQDN of the domain your Exchange Server is in;
<Exchange Server> is the Exchange Server that you intend to connect to;
<URL> is web application URL from step d. Verify public URL contains https and port number.
e.g.
.\Set-SiteMailboxConfig.ps1 -ExchangeSiteMailboxDomain scinaptic2013.com -ExchangeAutodiscoverDomain vs-server35.scinaptic2013.com -WebApplicationUrl vs-server15:82
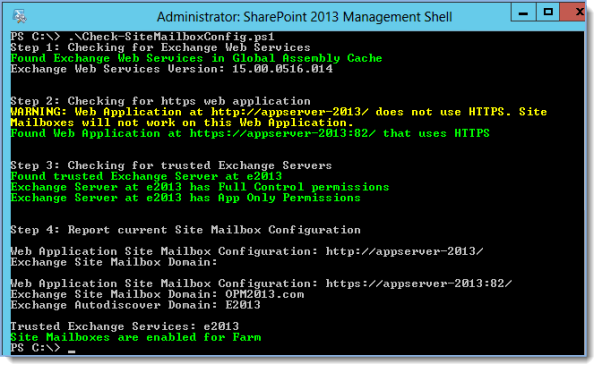
To confirm the current status of Site Mailboxes execute .\Check-SiteMailboxConfig.ps1 PowerShell script:
Tip: Ready to move onto the next stage of setting up the environment for SharePoint Site Mailboxes? See Establishing Trust and Service Permission on Exchange for more information.