
New article
Recently updated
Enabling NetBIOS in PowerShell

Who is this article for?OnePlace Administrators.
Administration access is required.
This guide introduces the process of enabling NetBIOS through PowerShell. Providing step-by-step instructions, this article ensures a seamless experience for users seeking to configure NetBIOS settings using PowerShell.
1. Enabling NetBIOS in PowerShell
- Save the following script as EnableNetBIOS.ps1 on the SharePoint server:
$ServiceApps = Get-SPServiceApplication
	$UserProfileServiceApp = ""
	foreach ($sa in $ServiceApps)
	 {if ($sa.DisplayName -eq "<UPSAname>")
	   {$UserProfileServiceApp = $sa}
	 }
	$UserProfileServiceApp.NetBIOSDomainNamesEnabled = 1
	$UserProfileServiceApp.Update()
Note: Where <UPSAname> is the name of the User Profile Service Application from steps in the previous article from previous section. By default <UPSAname> is “User Profile Service Application”.
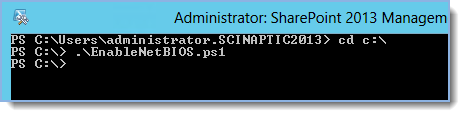
- Execute the ‘EnableNetBIOS.ps1’ script by:
- Starting SharePoint 2013 Management Shell,
- Change to the directory where you saved the file
- Execute the following command (with dot and slash in front of file name):
.\EnableNetBIOS.ps1
Tip: Ready to move onto the next stage of setting up the environment for SharePoint Site Mailboxes? See Starting the User Profile Service & Resetting IIS for more information.